Photo Credit: A Love in Focus Photography
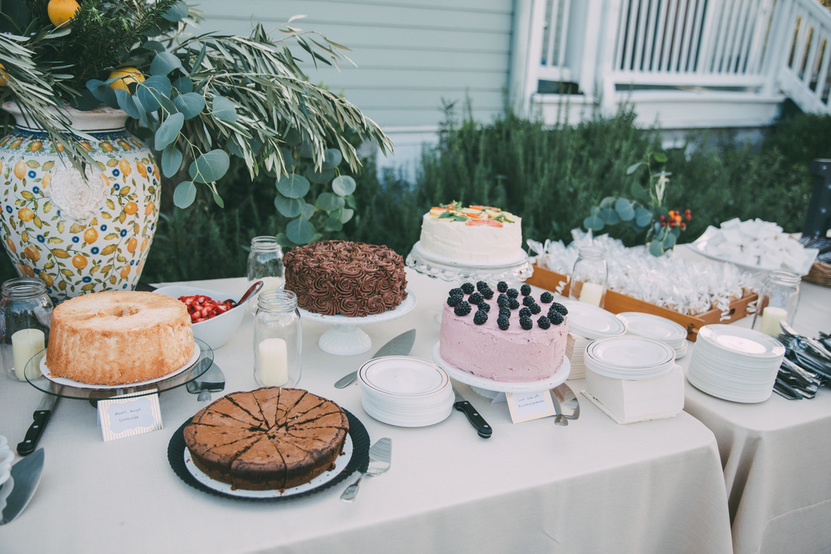
2016 is the start of a new me - new last name, new blog! Together with my family, fiance (now husband) & friends, I very recently pulled off an epic, beautiful, romantic, December garden-wedding - and it was almost all DIY. From the stacked dessert table to the cake toppers, the chalkboard signs to the special details, my family and I had a big hand in the success and DIY-beauty of our wedding. In this post series I'll share my normal girl tips and tricks on making your wedding reflect the real you, starting with the dessert table!
Wedding Tip of the Day: Let there be cake!
I encountered a lot of shock from friends and family members when I mentioned I wanted to bake my own cakes. "You don't need the added stress," said my wonderful mom, a fantastic baker and cook in her own right. But I knew that if I didn't bake my own cakes, there would always be a lingering bit of disappointment that the wedding could have been a little bit better - and a lot more me.
Browsing Pinterest really came in handy while planning the dessert table for our wedding. I wanted to make fun cakes that tasted great and that looked beautiful. The amazing bakers and bloggers on Pinterest post their recipes and tips on making incredible, beautiful cakes at home. My criteria were simple: 1) must be freezable, 2) must taste great, and 3) must be beautiful. I picked three cakes from three separate bakers that I felt fit the bill, then added tiny little touches of me: A gold-dusted chocolate rose cake, a citrus cake, and a blackberry lime cake!
Gold-dusted Chocolate Rose Cake
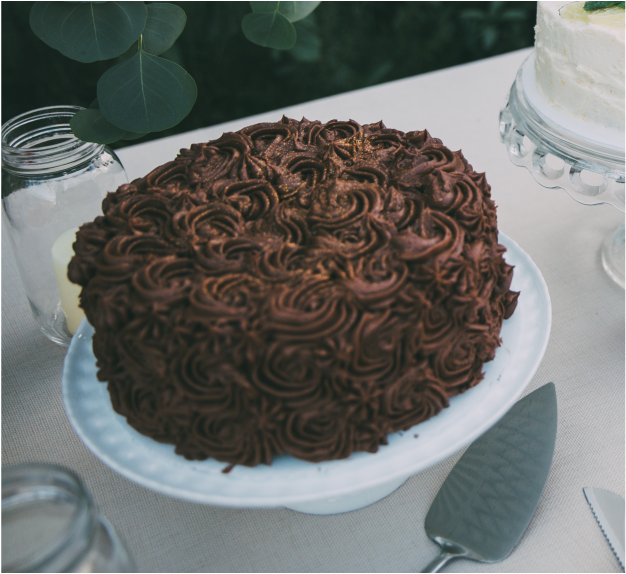
Photo Credit: A Love in Focus Photography_
The gold-dusted chocolate rose cake was the crowd-pleaser of the night! This was a combination of efforts, recipes and DIY tips sourced on Pinterest and the internet at large.
The base cake layer is a chocolate cake, following Ina Garten's (The Barefoot Contessa) recipe Beatty's Chocolate Cake Recipe. My mom suggested the cake - she'd made it a time or two, and mentioned that people just loved how rich, smooth and moist the cake turned out. The cake base used simple, easy to find ingredients, was a quick bake (only 35 minutes), and held up very, very well to freezing (a DIY baker girl's #1 backstage trick to baking in bulk for an event).
For the buttercream, I followed Amanda Rettke's (iambaker.net) recipe for a delicious Whipped Chocolate Buttercream Frosting. Another recipe with simple ingredients and easy-to-follow instructions. Amanda's site is also where I found the tutorial for piping the roses onto the cake! Her YouTube videos are so helpful, they made the whole piping process so easy! I practiced - using a box cake recipe - so I knew that for the wedding I'd get the roses just right.
I followed these recipes and tricks up with a dusting of edible glitter, to add a bit of me, and you get the beautiful gold-dusted, chocolate rose cake pictured above!
Citrus Cake with Orange Buttercream
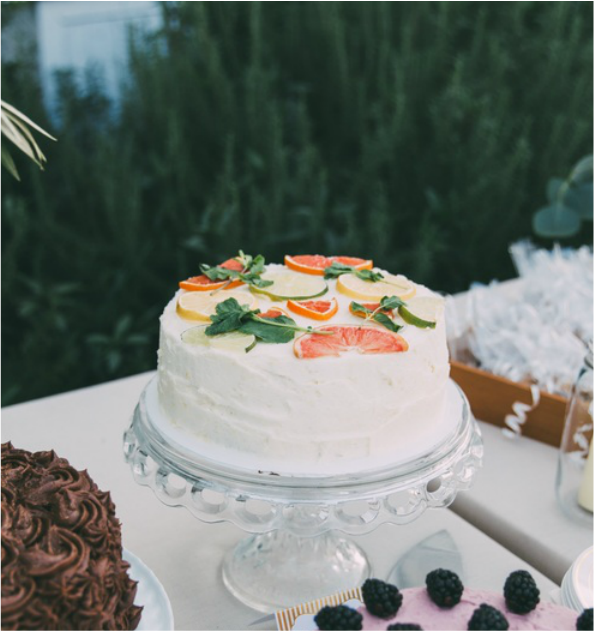
Photo Credit: A Love in Focus Photography
I was so excited about the beauty of this citrus cake. It was a cake I'd decided to make even before getting engaged. The base had orange, lemon and lime zest baked into a moist, vanilla cake. The mid-layer was a lemon curd - sugary and tart! And the buttercream was amazing - fresh orange juice and lemon zest folded into a traditional, vanilla buttercream. The decor was so precise and symmetrical - which I appreciated. It consisted of thinly sliced limes, lemons, oranges and blood oranges, with just a slight mint garnish.
For this recipe, I followed Apollina's recipe for her Citrus Cake with Lemon Curd Filling and Orange Lemon Icing (AKA Stella Cake). She'd based her cake recipe and design off of Stella McCartney's Spring 2011 fashion collection - she has photos of her inspiration all over her blog - go check it out! I made the recipe twice - once as a tester, and then the final cake. When you're freezing your cakes, remember - put them in an airtight container! This helps avoid freezer burn or the encroachment of other freezers foods into the taste of your cake.
Short on time? The original blog's author made her own lemon curd - extreme credit to her! I substituted Dickenson's Lemon Curd, a ready made option found in most grocer's jelly aisles. This held up great during freezing, and guaranteed I didn't have to make curd after curd to find the perfect consistency.
Lime Cake with Blackberry Buttercream
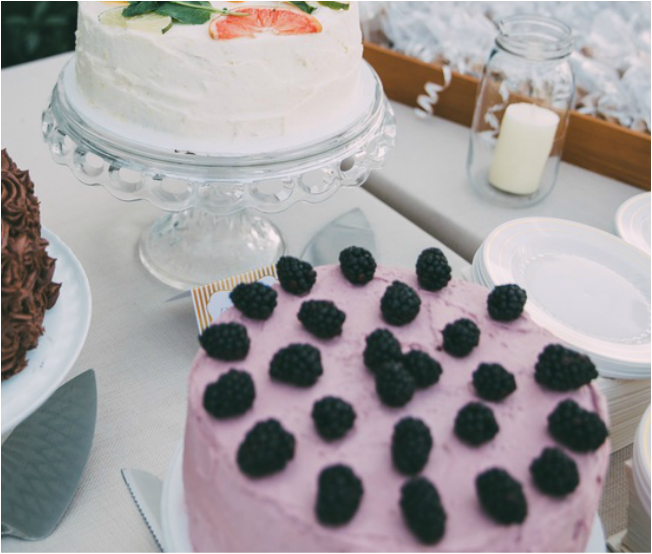
Photo Credit: A Love in Focus Photography
The final cake of my three "show stopper" cakes was a lime cake with a blackberry buttercream. By this point, I'm sure it's easy to see that I love citrus cakes. I also love berries! I wanted a pop of color on the cake table, and this cake, for me, was the perfect fit!
For the lime cake recipe, and for the decor inspiration on the cake, I followed Tiffany's recipe at Creme de la Crumb, a beautiful blog run by a very talented photographer and cook. I'm so lucky to have Alyssa, from A Love in Focus Photography, as an occasional contributor on this blog. Without her, the pictures will be...well, you'll see.
I didn't follow Creme de la Crumb's recipe for their blackberry icing. While it looks absolutely delicious, the primary ingredient in the recipe was heavy cream, which would not have frozen well for an extended period of time (my husband's aunt let me know - dairy doesn't freeze well). So instead, I followed Ashley's Blackberry Buttercream recipe on Baker by Nature, a New York blogger with incredible recipes on her site.
Again, as I was short on time, instead of making the blackberry reduction, I substituted a blackberry jam into the buttercream. It turn out delicious - though, if you're comparing the photos, mine came out a bit lighter in color than Ashley's.
I loved the cakes at my wedding (though I didn't get to sample them until the next day - nerves, nerves, nerves). For all you future brides out there, just know - you can do it! And if you can't, you can always buy it.
Until next time,
Naomi
Until next time,
Naomi
1 Comment
